Before installing the presets
please download VN app
Installation Steps:
A step-by-step breakdown of the installation

Download the VN app
First, download the editing App. Go to your App Store or Play Store and download the VN app for FREE.

Download after purchase
After your purchase, click on the Download button on your confirmation Page. Don't worry, you will also receive a confirmation email with the link.

Confirm The Download
Click on the Download button

Go to the Download Folder
As indicated in the image, click on the button to the left of the URL.

Select Download
Select Download on the popup menu illustrated in the picture. That will take you to the Download folder. It is located under the FILE section of your phone. (NOT Camera Roll),

Unzip the file
Click on the .zip file (circled in red) with the name of the preset. That will open the preset pack folder.
If your smartphone has a built-in zip extractor the folder with the separate presets will be visible immediately. Open the folder, and you should see a number of different files (.CUBE): these are your presets. If your smartphone doesn't have a built-in zip extractor, you can download one in the App Store such as 'Zip Extractor' for iPhone or 'Zarchiver' for Android, and open the zip file with it.
If the file does not unzip on your phone

Confirm The File Is Unzipped
You should now see the folder with all your presets. Make sure you can see the folder before you move to the next step.

Start VN App
Open the VN app on your phone

Click on the + sign
Click in the blue button with the + sign

Click on "Creation Kits"
Click on creation kits on the top of the screen

Click on "Filters"
Click on the button filters

Select "My Filters"
Once inside filters, you will select MY FILTERS on the top right corner

Select "Import Filters"
Once inside filters, you will select IMPORT FILTERS on the bottom of the screem.
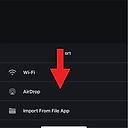
Select "Import From File App"
On the popup menu, you will select "Import From File App". It should be the first option from bottom to the top.

Search "Video Preset"
Now you are going to select the folder that you unzipped previously. It may be faster if you make a search with the name of the preset. Click on the folder to open.

Select The Preset
Now you are going to start bringing the preset to the app. So select the first one to import. Followed by a folder menu.

Select "New Folder"
Click on New Folder, and now you are going to create a special folder for your presets.

Name The Preset Folder
Write the name of the pack, select an image that you want, and select DONE

Confirm Creation
Now you should see your preset folder created. Your next step is to import the remaining files.

Select "Import Filter"
Click on the Import Button Again and start the importing the other files.

Repeat The Process For Each File
Go back to the files and repeat the process for each preset, this time only placing the files under the preset group you have created.
Now Go Create Amazing Videos!!
We want to see your progress, so tag your new and improved content #biamagic.